Google’s latest smartphone running on Android Kit Kat 4.4, the Nexus 5 has a non-removable battery at least, that is what Google claims. A new guide from the guys over at NewLife2DoStuff show you just how this “non-removable” battery is actually very replaceable. In this guide we will show you how to do just so, keep in mind that doing this could void your device’s warranty.
What are the required tools? Before we get started we should make sure we got all the tools we need: Small screwdriver to remove the screws, the new battery for your device and optionally a tool that will make removing the back panel easier
Why would i want to replace my battery? There could be many reasons, maybe your battery broke, you want to upgrade it to a better one or you are experiencing drain issues, something that Google has officially acknowledged the device is experiencing.
What to do before getting started. This guide starts at removing the screws, so we take for granted that you have already removed the back cover of your Nexus 5, as shown in the image bellow
Once you have done this, we can proceed to start removing the battery of the device, make sure to follow these steps and not skip any (also, make sure to turn your device off if you haven’t already)
- First of all we have to remove 6 screws from the device, make sure to remove them (as seen in the image bellow) and keep them somewhere safe to make sure you won’t lose them

- Once you have removed the screws, we can proceed to remove the plastic cover that should come of verily easy, leaving the motherboard of the device exposed.
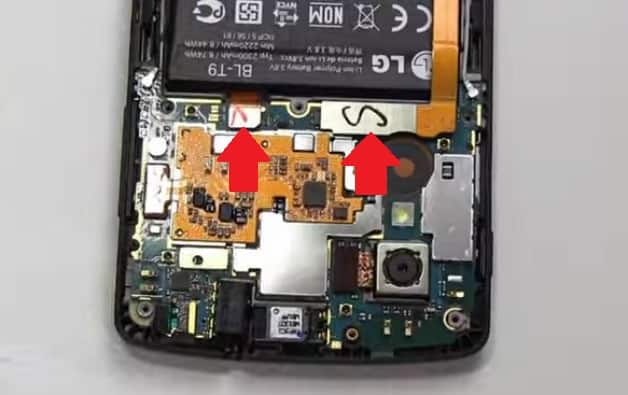
- Now, this is the tricky part, once you have completed step 1, you will see 2 little metal labels, you will have to gently move these up (try not to bend them) and the battery should come right off)

- Once these are lose, make sure to not pull from them as it won’t do much. The battery is still inside and won’t come out all too easy, make sure to use a thin tool to loosen it up

- and voila, you have now successfully removed the battery!
- Ok, Lets start assembling everything back again, first make sure to put your new (or old) battery back in, carefully connect the 2 connectors that we removed in step 3 back, put on the black plastic cover that covered up the motherboard and put back the 6 screws. Once you have done this you can put back the backpanel and you are all good!
All credit of this guide goes to the guys over at NewLife2DoStuff, here is their video in which they give a demonstration on how to remove the battery.


