Google has publicly launched the Android M Developer Preview after Google I/O, this means that everybody can download Android M and test it on their device. Android M is still in Beta stage which means it contains bugs, system errors and shouldn’t be used as a daily driver.
We already made a guide on how to install Android M with MultiROM which allows you to run both Android 5.1.1 Lollipop (or later) and Android M simultaneously but it is also possible to Downgrade Android M to an older Android version, this means returning your device to a previous (more stable) software version. The guide bellow will give you step by step instructions on how to get your device running Android M Developer Preview back to Android 5.1.1, Android 5.0.2, Android 5.0.1 or Android 5.0 Lollipop
Before Downgrading Android M it is important to know that in order to do so you will have to completely wipe all data off your device (perform a Factory reset of Android M).
How to Downgrade Android M To Android 5.1.1 Lollipop
Step 1 – Download appropriate factory image
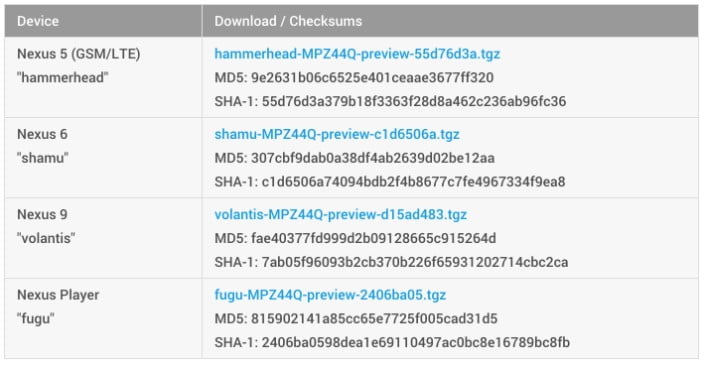
If you want to downgrade your Android device you will have to download the appropriate factory image for it, this means downloading the factory image of the Android version you want to return to. We highly recommend you head over to the Nexus factory image and download the Android version you want your Nexus device to downgrade to.
Step 2 – Backup and prepare your device
Like mentioned earlier, in order to downgrade Android M to a previous Android version you will have to completely factory reset your device, with it losing all data on it. There are several different backup methods we recommend you doing first in order to prevent losing data, we recommend checking out our guide on How to Factory Reset and Backup Android M
Step 3 – Install ADB and Unlock your device

Before performing the actual downgrade you will have to prepare your computer by installing ADB and Fastboot on your Mac, Linux or PC. Here is how to install ADB on Windows:
- Download ADB for Windows here
- Run it by right clicking the file and choose the “Run as Administrator”
- A command window will show, type “Y” and hit enter
- When it asks to install drivers, hit the “Y” Again and hit enter.
Step 4 – Factory Reset and enabling Developer Options
After doing what is the most annoying part of downgrading Android we can go on to preparing your device. First we will have to enable developer options. In Android M you can enable developer options by hitting the Build Number in Settings 7 times.
Plug your device into your computer and when it asks if you want to Trust this Computer hit the Yes option, then go to the adb folder which should be at C:\adb and then type cmd in the address bar to open a command window and then type adb devices this should show you if your Android device is correctly connected to your computer. Now to perform the Factory Reset follow these steps:
- Turn your Device off
- Hold the Volume Down and Power button to reboot into the bootloader
- Choose Recovery Mode
- When you see a small android logo, you need to press and hold the power button and then press volume up once.
- choose to wipe cache partition. Scroll with volume buttons and choose with power.
- Then choose to wipe data/factory reset then scroll to Yes and select.
Step 5 – Downgrade Android M
The final and most important step in our journey to downgrading Android M is to actually install your new Android 5.1.1 Lollipop (or older) factory image. Follow these steps bellow:
- On your PC go to the Windows Home and type “CMD” to open the command window
- Type: flash-all.bat
- This will take some time but after a while your device will reboot and boot into Android Lollipop.


